
Before starting to collect samples one should think about the objectives, the purpose of the investigation. Samples can be taken to characterize a particular unit, just like one would use a grainsize. If that is the objective it is not necessary to bother too much about orientation. If, on the other hand, one wishes to try a microfabric, orientation is very important.
The objective of the sampling determines the following aspects of sampling:
Size: as each thin section only represents a small, and possibly nonrepresentative part of the sampled unit or exposure, it is recommended to collect more than one sample. A unit may, macroscopically, look completely uniform, while microscopically there may exist important differences. The only way to find out is by systematic sampling.
Site, location and number: in case of a more complex sequence, one should sample each unit. Depending on the thickness of the unit, or on small differences in grain size, it may be advisable to collect more than one sample. Because boundaries between units are important markers - they may mark hiatuses or changes in provenance - it is important to collect samples across the boundaries between units. Collecting samples in the large size containers indicated above, enables the sampling of representative portions of each unit together with the boundary. Because e.g. folds can be produced by flow as well as by tectonic action, all structural elements are also obvious targets for sampling.
When one wants to study the primary features of a glacial deposit it is obvious that one must avoid all zones that are effected by e.g. weathering, soil formation, seasonal frost, or slope movement. Weathering and soil formation completely change the structure and composition of the material. These processes are the object of different studies. Seasonal frost may cause the formation of a silt-droplet structure, which is completely different from glacially induced structures (see below).
When studying older Pleistocene deposits one must realize that, during younger glacials, the glacial deposits may have been influenced not only by soil formation but also by prolonged permafrost. Depending on the depth and the regime of permafrost this may have a profound effect on the properties of the glacial deposits, even to the effect that no original glacial properties are preserved (van der Meer et al., 1993). Similarly slope movement, which can be of different intensity during warm and cold periods, can strongly influence the properties of glacial deposits. Hence it is very important in sampling to record slope angle and slope attitude and to check for macroscopically detectable effects of slope movement. Because certain microscopic features (discussed below) can be the result of the composition, it is recommended to take bulk samples of the studied section as well. Such samples should be large enough to allow grainsize analyses, determination of carbonate content and preferably also clay mineralogy. When sampling a complex sequence bulk samples must be collected from each unit, parallel to the thin section sampling.
Orientation: whether a sample is taken vertical, horizontal or flat depends on what one wants to sample. However, it is important to note that the position of a sample is not necessarily vertical. First of all it is necessary to realize that vertical or horizontal refer to a vertical pit face or core. In a vertical sample the sample long-axis is vertical, in a horizontal sample it is perpendicular to this. A flat sample has been collected from a horizontal surface.
Time of sampling: it may be important to consider the time of sampling. Very wet conditions may make it difficult to get samples to the laboratory undisturbed. It can then be advisable to wait for dryer conditions. In practice the option does not exist, because samples have to be taken when one is in the field, especially when it is a remote place.
Method: for micromorphological research undisturbed and oriented samples are needed, which requires specific sampling techniques and precautions. The common methods used to obtain micromorphological samples are reviewed by Murphy (1986). He provided much practical advice on sampling techniques.
A). Cemented and cohesive material
Undisturbed specimen of cemented and cohesive materials can be obtained by carving or
chiseling pieces out of the soil or sediment. All such samples should be wrapped tightly in
protective material, such as aluminum foil or plastic, with marked orientation and properly
labeled.
B). Loose material
In case of very loose or brittle material the sediment may have to be pre-impregnated in the
field, before sampling and transport. The sediment is covered and partially impregnated with
a cementing agent. After the cement has hardened, the sample can be removed, labeled and
wrapped as previously described. Cementing agents are, for example, a colourless varnish
(cellulose acetate solution in acetone), polyester resin, or an epoxy resin.
C). Non-coherent material
Non-coherent material is mostly sampled with the help of metal or cardboard boxes. The
Kubi‰na-size box is 8x6x4 cm, the mammoth-size box is 15x8x5 cm. The boxes have two
loose lids and a body that can be opened, so that samples easily can be removed in the
laboratory without disturbance. Preferably the body has a cutting edge on one side.
Procedure in the field:
Figures 1-3 show some examples of sequences that have been sampled:
The first one (Fig. 1) is a composite section in a rather homogenous till, overlying a shear zone, while the top has been disturbed by cryoturbation. (location: ter Idzard, northern Netherlands; see Rappol et al., 1989). As the Figure demonstrates samples were taken of all textural and structural units recognized in the field, and also across boundaries and structures. The till in the cryoturbated top was not sampled, as there was no interest in postdepositional changes at that level.
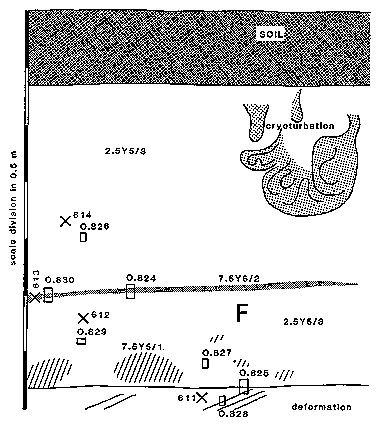
Fig. 1. Composite sketch of part of the till sequence at ter Idzard, The Netherlands. Sample locations are marked X for bulk samples, rectangles for thin sections and F for$ upper part of the till is cryoturbated and mixed with Weichselian coversand to $ m. At about 80 cm from the base, the till contains a darker, slightly more clay$ (shaded), while near the base there are some irregular darker zones (inclined h$ base consists of a shear zone. Ice movement left to right (from Rappol et al., 1989).
The second example (Fig. 2) shows the samples collected in a thick till sequence in which there were signs of soil development as well as of some periglacial activity. The reason for sampling this part of the sequence was that in The Netherlands till is invariably of Saalian age (penultimate glaciation). As the country was not glaciated during the last glacial cycle (Weichselian), the top of the till is always missing. An at least 2 to 3 m thick layer has been eroded during the Eemian and the Weichselian (van der Meer & Lagerlund, 1991). The example shown (location: Grouw, northern Netherlands; unpublished) is one of the rare occasions were the undulating top of the till has been preserved as it was buried immediately after emplacement, towards the end of the Saalian. The section selected for sampling demonstrates that the top of the till, even in this locality, has been disturbed by small scale, but intensive cryoturbation or loadcasting, by slope movement (flow), frost action (wedge for- mation) and soil development (organic matter accumulation, decalcification). The samples have been selected in such a way that all relevant textural and structural units recognized in the field are represented. As boundaries are partly of nonglacial origin, less attention has been paid to their representation. Not shown is a second, less disturbed profile from the same pit, that has also been sampled.
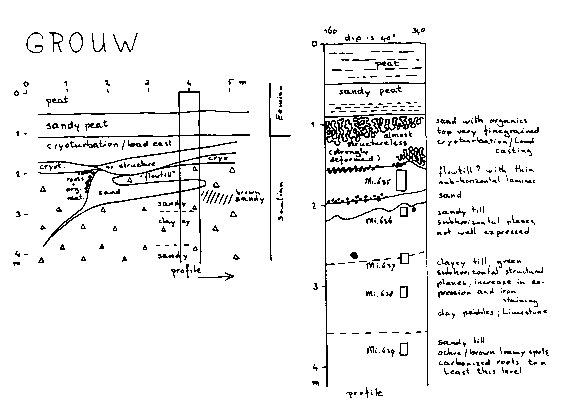
Fig. 2. Sketch of the top of the till sequence exposed at Grouw in the northern Netherlands. The lefthand shows the overall structure of the sampling site, and the right-ha$ profile. It is clear that the top of the till has been influenced by cryoturbat$ slope movement and fissuring before the onset of the Eemian interglacial. Sampl$ were selected in order to cover the full range of textures and structural units$ beds (unpublished data).
The last example is represented by Figure 3. This time it concerns a
core that was collected
for geotechnical testing prior to the construction of a railway fly-over near Oldenzaal in the
eastern Netherlands (see Kluiving et al., 1991). The base of the till sequence has not been
reached. There was another core available (and sampled) that was about 2 m shorter; both
were already quite dry when presented to us. As there was no apparent difference in texture
of the diamictic beds, Figure 3 gives a detailed record of changes in colour as well as of the
position of intraclasts of clay, silt and sand. At the time, the cores were
available, we could only select a limited number of samples. Hence the samples were
positioned in such a way as to cover all the uniform diamictons adequately and at the same
time have examples of the different textures and structures of the intraclasts. A similar
selection was made from the second core, resulting in a total of about 15 samples. Analyses
of the thin sections (van Ginkel, 1991) did not reveal that the till sequence comprised three
different till beds as shown during subsequent construction
of the fly-over (Kluiving et al., 1991). We must thus conclude that not enough samples were
selected from the cores. The fact that we had no samples from the reach between 7.0 and 11.0
m meant that we had missed one till bed completely.

Fig. 3. Sketch of core LVGM 011 collected near Oldenzaal, eastern Netherlands. The sketch shows all the details in colour, structure, and texture of intraclasts observed in the core. Only the position of clay pebbles is schematic. Labeled black bars indicate the position of thin section samples. As explained in the text, the lack of samples from the reach 7.0 to 11.0 m resulted in completely missing one different till bed (van Ginkel, 1991).
A completely different strategy must be developed when discussing the
interpretation of
microscopic features of glacial sediments. As mentioned below, it will be necessary to
compare thin sections of Pleistocene or older glacial deposits, with examples from the
presentday environment. When the genesis of the latter is known, they can be used for
calibration. However, also in the presentday environment the genesis is not always clear.
When we see a till underneath a glacier, we do not jet know whether it has been deposited
there by melt-out or by lodgement or emplaced as a clast. We do not know whether it has
been deposited repeatedly after freezing on to the glacier sole each winter. Nor do we know
whether it is an older Holocene till that has been eroded during the Neoglacial advance. And
if the till occurs as smaller or larger flutes or as drumlins, must it than be taken as an example
of deformation ?
We have to develop strategies for collecting samples from the presentday environment, that can withstand all criticism as to their origin. Most simple to sample are flow tills, as that is a process that can be directly observed in the field. In order to differentiate between melt-out and lodgement till it may well be possible that we will have to rely on experiments. Produce debris-rich ice and let it melt under natural (?) conditions. It must however be realized that when melting ice one has to consider free drainage and/or ponding of meltwater. Furthermore under natural conditions (energy provided by geothermal heat) basal debris-rich ice mainly melts from beneath at a rate not exceeding 1 cm of ice per year. It will take a long time before time before there will be a representative deposit that can be sampled for thin sectioning.
See Figure 4 for the routing from sampling in the field to final thin section.
Making thin sections requires three basic operations:
Drying of samples:
Samples can be dried at room temperature, followed by drying in an oven at
40 řC or less.
Instead of removing the water by evaporation moist samples can be
submerged in
an acetone
bath where the water will diffuse out of the voids and into the acetone
solution surrounding
the sample. Acetone replacement minimizes shrinkage and crack formation.
However, some
organic cements will be dissolved in acetone, though not all organic
matter is
readily
dissolved. The method has been used, for example, to replace water in
peats
(Miedema et al.,
1974). See also Murphy (1986), Tippktter et al. (1986), and Lee & Kemp
(1992).
Freeze-drying:
Jongerius and Heintzberger (1975) recommended that freeze-drying can be
used
on samples
that will shrink considerably with air or oven-drying, and which contain
organic materials that
may dissolve in acetone. The samples, less than 2 cm thick, are dipped
into
liquid Freon 12
(CCl2) so that the water in the sample is quickly frozen at a temperature
of
ca. -158 řC.
After
freezing, the samples are transferred to an ice condensator where the ice
can
be removed from
the sample by sublimation. However, use of Freon 12 is prohibited in some
countries because of the potential damage to the ozone layer.
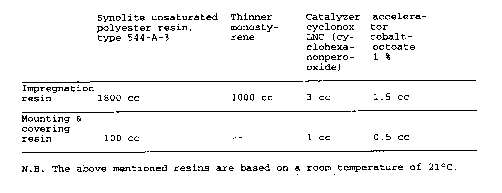
Impregnation and hardening:
Samples of soils and sediments are hardened in Amsterdam by impregnation
with an
unsaturated polyester resin, Frencken Synolite, type 544-A-3, with
monostyrene
as thinner,
cyclonox LNC as catalyst and cobaltoctate (1 %) as accelerator (see for
the
composition the
table below). Other types of resin are epoxy, crystic resin and methyl
methacrylate (Lee and
Kemp, 1992; Murphy, 1986; Smart and Tovey, 1982). The samples are
impregnated
under
vacuum. After impregnation a pressure of ca. 6 atmospheres is exerted on
the
samples with
nitrogen gas, to improve the impregnation.
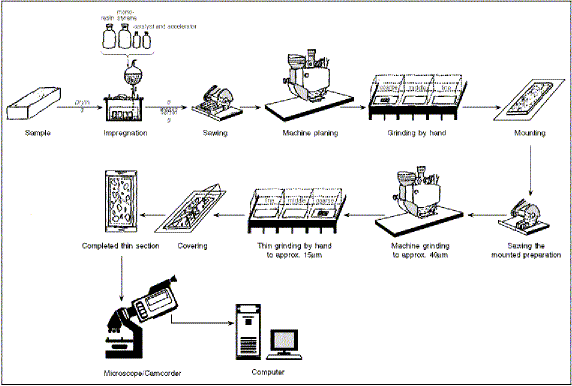
Fig. 4. Routing of the Uv.Amsterdam/Brock U. procedures for making thin sections; from sampling in the field to the final thin section.
The hardening occurs during 6 weeks in a fume cupboard. After this, the
samples are still
sticky, hence they are placed in an oven and fully cured at 40 řC for two
to
three days.
Sawing and grinding:
After hardening of the resin a slab is sawn from the block, using a
diamond
studded sawing
blade. The slab is ground with a grinding machine and finally by hand with
korund powder
or papers or on diamond platen (Lee & Kemp, 1992), until scratches are
removed.
The slab is mounted with the resin (see table for the composition) on an
object glass, 1 mm
thick. When fully cured, the slide is placed in a special jig and the slab
is
sawn to a thickness
of 1-2 mm.
After this the slide is ground and polished, first with a machine, and
finally
by hand to a
thickness of ca. 20 micron. The final thickness is reached when the quartz
grains are white
to grey in colour, in cross-polarized light.
After cleaning, the slide is covered with a cover glass (0.17 mm thick).
During all the
treatments oil should be used as lubricating agent, instead of water, to
prevent swelling of
clays and dissolution of salts.
Most common thin section sizes are: 28 x 48 mm (petrographic size), 80 x 60 mm (Kubina size) and 150 x 80 mm (mammoth size), depending on the type of research. During sampling and sample preparations there are several steps that may influence the final thin section. Some of these effects, like shocks, have been mentioned above. Others, like some effects of incomplete impregnation will be mentioned later, especially in the section on Structure.
